It is known that every four months, a technician from the DEDDIE visits the consumer's premises to carry out the "proper registration of the indication" measurement of the electricity meter. This procedure is required in order to issue a final bill for the ΔΕΗ and for other electricity providers.
It is also worth noting that if you receive a bill every two months or even every month, respectively, you will receive one or even three additional bills before the final bill.
Electronic registration of electricity - Registration of current indication
Next we will see how we see our measurement if we have an analogue meter or a digital meter or a meter with indicators.
How do we see the Power meter indicator on an analog power meter?
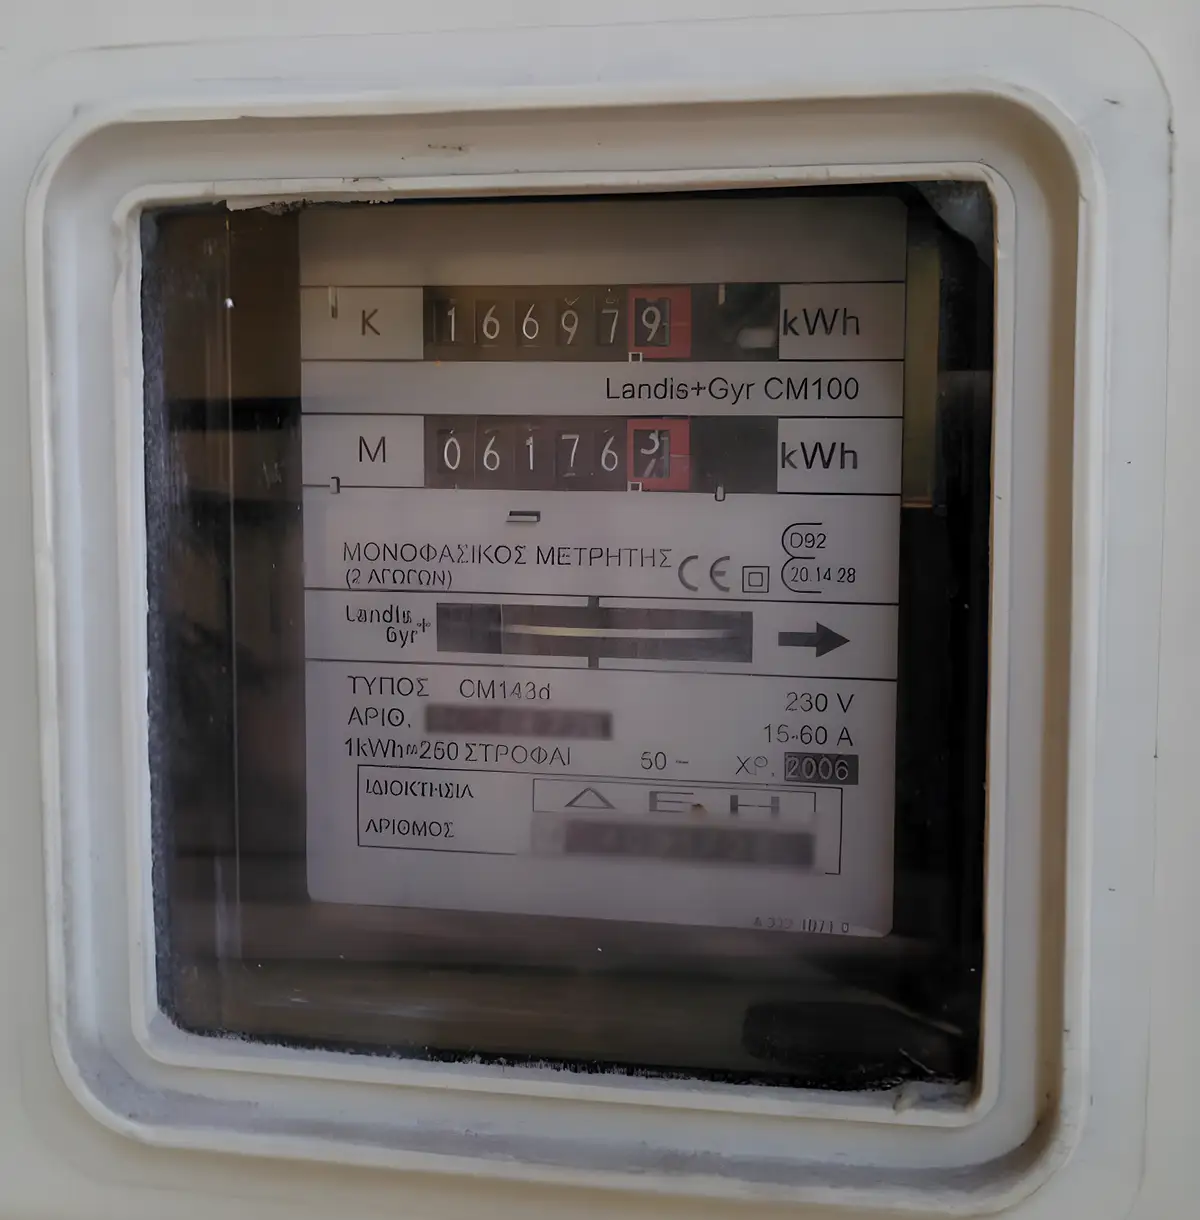
Analogue current meter - index registration
Analogue electricity meter - index entry - index entryaAn analogue electricity meter is the meter we often find in homes and businesses. It is a reliable way of measuring electricity consumption and paying the appropriate amount to the electricity provider. But how does it work exactly?
The Two Counts: Day and Night
On the analog current meter, we usually see two different measurements. Each of them represents the energy consumption at a different time:
Daily Consumption
This measurement is denoted by the "K" on the left side of the meter. It represents the daily electricity consumption. Consider your usage at a time when the sun is shining brightly and the lights are on.
Night Consumption
This measurement is marked "M" on the left side. It represents the energy consumption during the night, when the lights are usually off and the cooling and heating systems are running.
In the example shown in the picture above, there are two different numbers: "16697" and "06176". Let's see what these numbers mean:
Registration of an energy meter indication
Daily Consumption (K): the number "16697" represents the daily electricity consumption. This value indicates the amount of energy consumed during the day. This may include your use for lighting, electrical appliances and other daily activities.
Night Consumption (M): the number "06176" represents the energy consumption during the night. This value indicates how much electricity was consumed during the hours when mostly people are resting and homes are on standby.
Note: The decimal places you may see in the red box are usually ignored. These digits may represent minor differences in measurement accuracy and do not have a significant impact on the consumption calculation.
The metal label on the bottom of the meter is the Supply number which is also indicated on the your account.
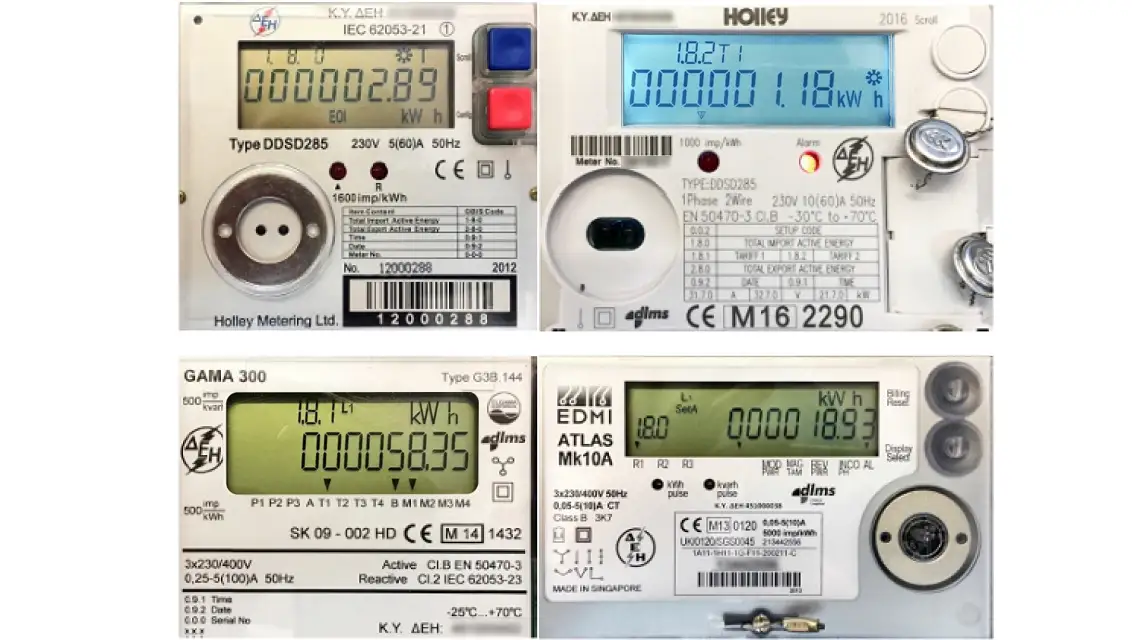
How do we see our measurement on our digital current meter - digital current meter - digital tide meter indications?
Digital current meter
The digital electricity meter offers accuracy and convenience in measuring energy consumption. However, we need to know which readings to take into account:
- Total Consumption (1.8.0): '1.8.0' represents the total power consumption, including day and night consumption. This measurement is important when there is no separate charge for night consumption.
- Daily Consumption (1.8.1): The indication "1.8.1" represents the daily power consumption. This measure
- Night Consumption (1.8.2): The indication "1.8.2" represents the night-time power consumption. This measurement refers to energy use during the night.
It is important to remove the decimal places after the dot in each measurement, as they do not affect consumption.
Tips for the Digital Meter - Current Indication Recording
In case you are using a digital current meter, maintain vigilance as to the measurements. It is important to regularly check your readings to make sure they correspond to your actual consumption.
Finally, we would like to point out that if you have activated night billing in your invoice, you should normally take into account the measurements "1.8.1" as day and "1.8.2" as night.
How do we view our current metering on each type of clock?
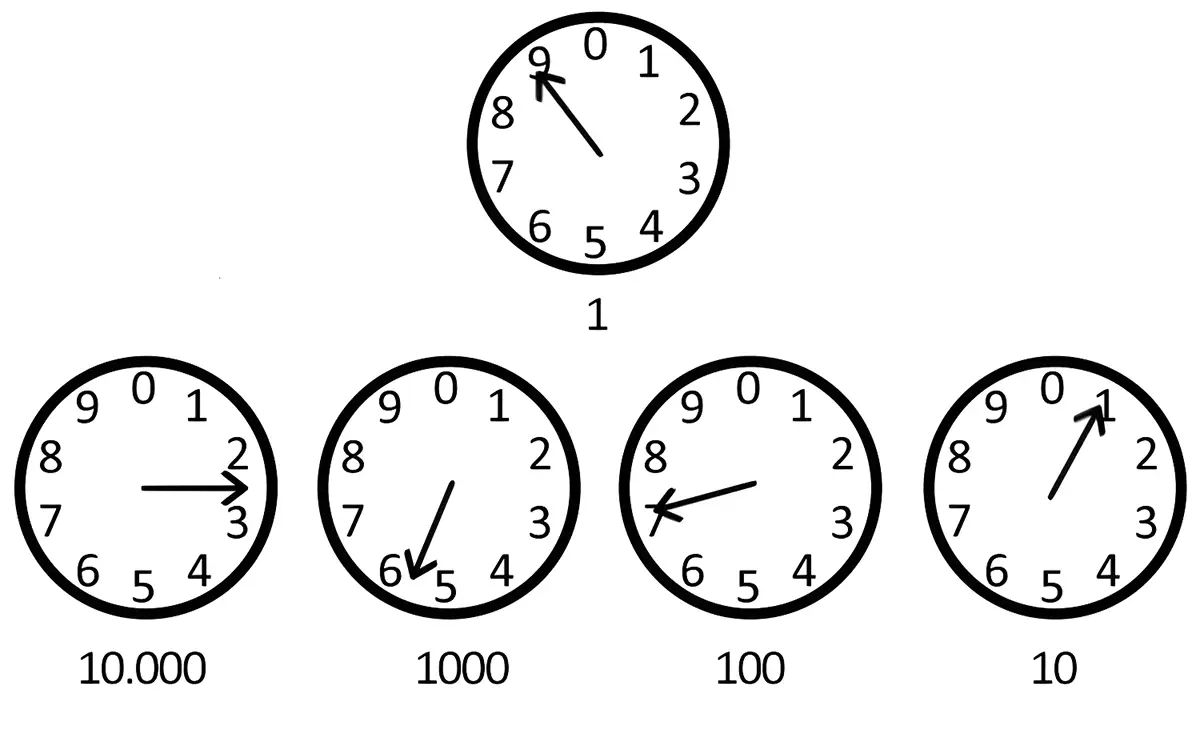
Old analog meter with cycles
This old analog meter, which some people call "cyclical," may seem a little more difficult to use, but with a good understanding of its system, it can be complicated only at first. As an experienced user, you have provided valuable information for reading it.
Some of us may feel a bit disoriented when the arrow of the roundabout points between two numbers, understanding the next roundabout can help us decide which number to consider.
It is important not to skip the different circles when reading, as each of them corresponds to a different order of the number. Also, be careful to count the numbers under the circles, as they indicate the tens corresponding to each number.
As a community, we have the possibility to ask for the replacement of this old type of meter with a digital one, if we consider it necessary. The most important thing is to keep up to date with our consumption and try to be responsible energy consumers for the sake of our environment and our economy.
For example, the image above shows the measurement 25709. But let's explain it in simple terms:
Cycle 1: The Beginning
For example, let's look at the first little circle in the picture with the number "10,000" underneath. As we look at the picture, we notice that the arrow points between 2 and 3. According to this indicator, the count starts to shape up as follows: "20000". In this case, we always take as the number the number that has just passed the arrow.
Cycle 2: The Second Number
We move to the second roundabout, which has the number "1000" underneath. Looking carefully, notice that the arrow points between 5 and 6. This means that the count is configured as follows: "25000". It is important to follow the same principle in this case as well.
Continuing the Reading
We proceed to read and explore the remaining circles until we reach the one with "1" underneath (ignore the one in red with the number "1/10"). With this precise method, we understand how the count is formed.
This is an example that helps us understand how measuring devices work. It is important to be careful and follow the indications given to obtain accurate measurements.
For more information you can also take a look at ΔΕΗ instructions.
How can I register my metering in myΔEH (e-SelfMetering)?
In this guide, we will show you how you can easily register your metering in the myDEH service (e-SelfMetering). Follow the steps below to complete the process without any complexities or hassle. You can do it via computer and also via mobile by downloading the app Android or iOS.
Step 1: Login to the myDEH Service (e-SelfMetering)
First, enter the service myΔΕΗ (e-SelfMetering) on your computer. If you don't have an account, create a new one.
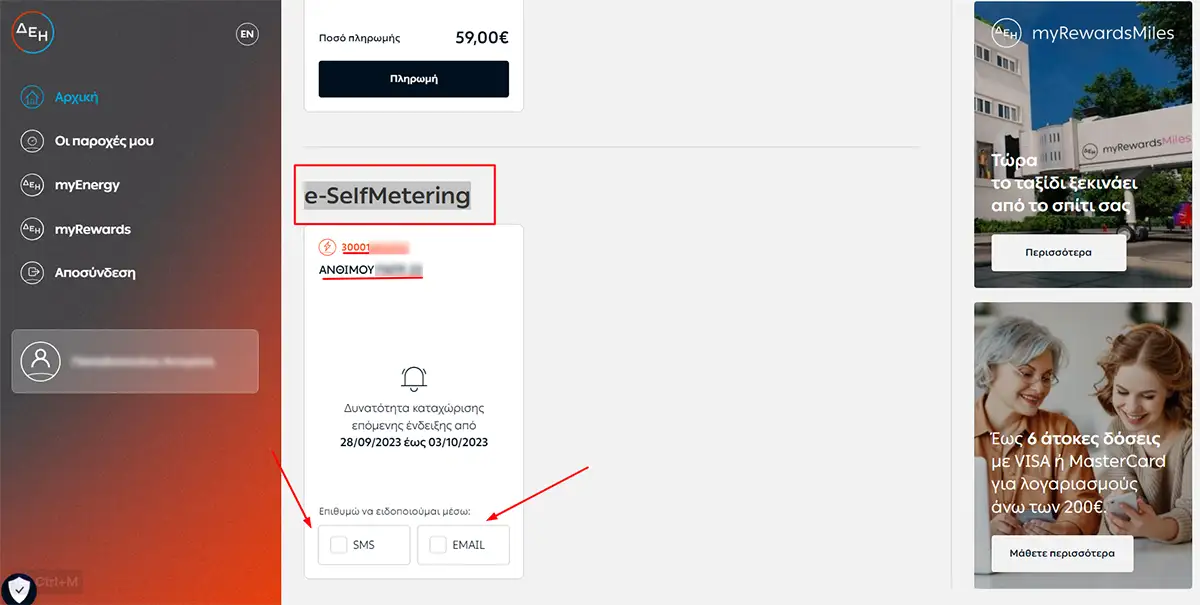
Step 2: Go to "Metering Entry - e-SelfMetering" - current indication entry
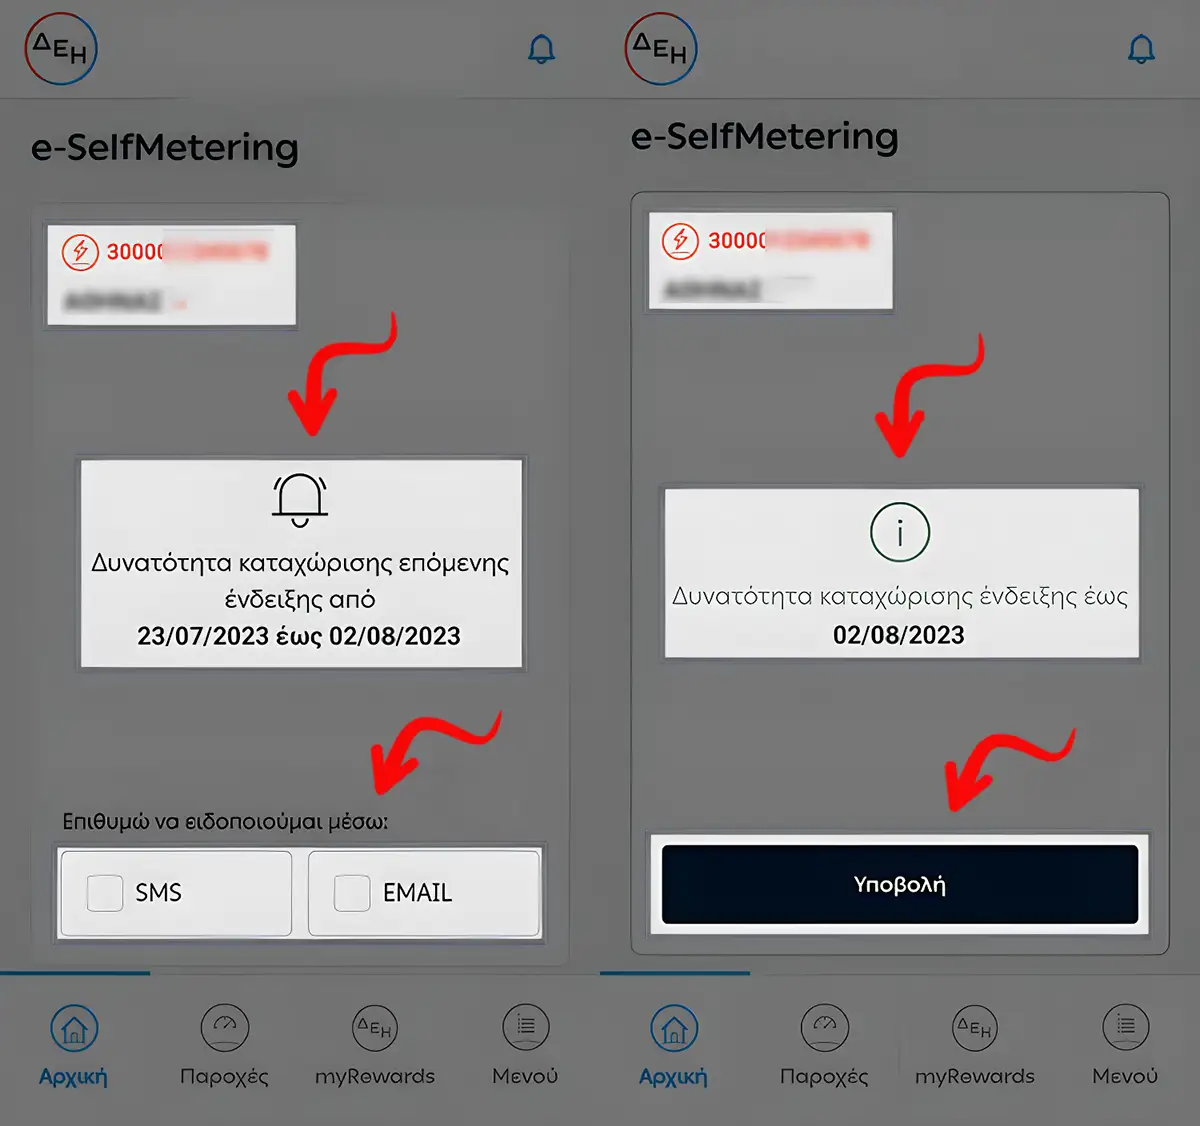
When you are on the home screen of the myDEH application, look for the "e-SelfMetering" option. Under this, you will discover your contract account associated with the supply address that employs you.
At this stage, there are two different scenarios that may appear on your screen:
α. If you notice a bell icon and the text "Ability to enter next reading (dates)", this indicates that the time to enter your meter readings has not yet come. You should check the application during the time period set for you. In addition, you can select the "SMS" and "EMAIL" options if you wish to receive notifications when the entry of your meter readings is available.
β. If you see the symbol "i" and the text "Ability to enter indication until (date)", then you are able to enter your meter readings by starting the process via the "Submit" option.
Step 3: Fill in your measurement data
The e-SelfMetering is addressed to low-voltage residential customers as well as business customers of categories C21 and C23. The program does not cover cases related to power and reactive, photovoltaic, net metering, agricultural tariffs - interruptible, street and square lighting tariffs, as well as customers in category C22.
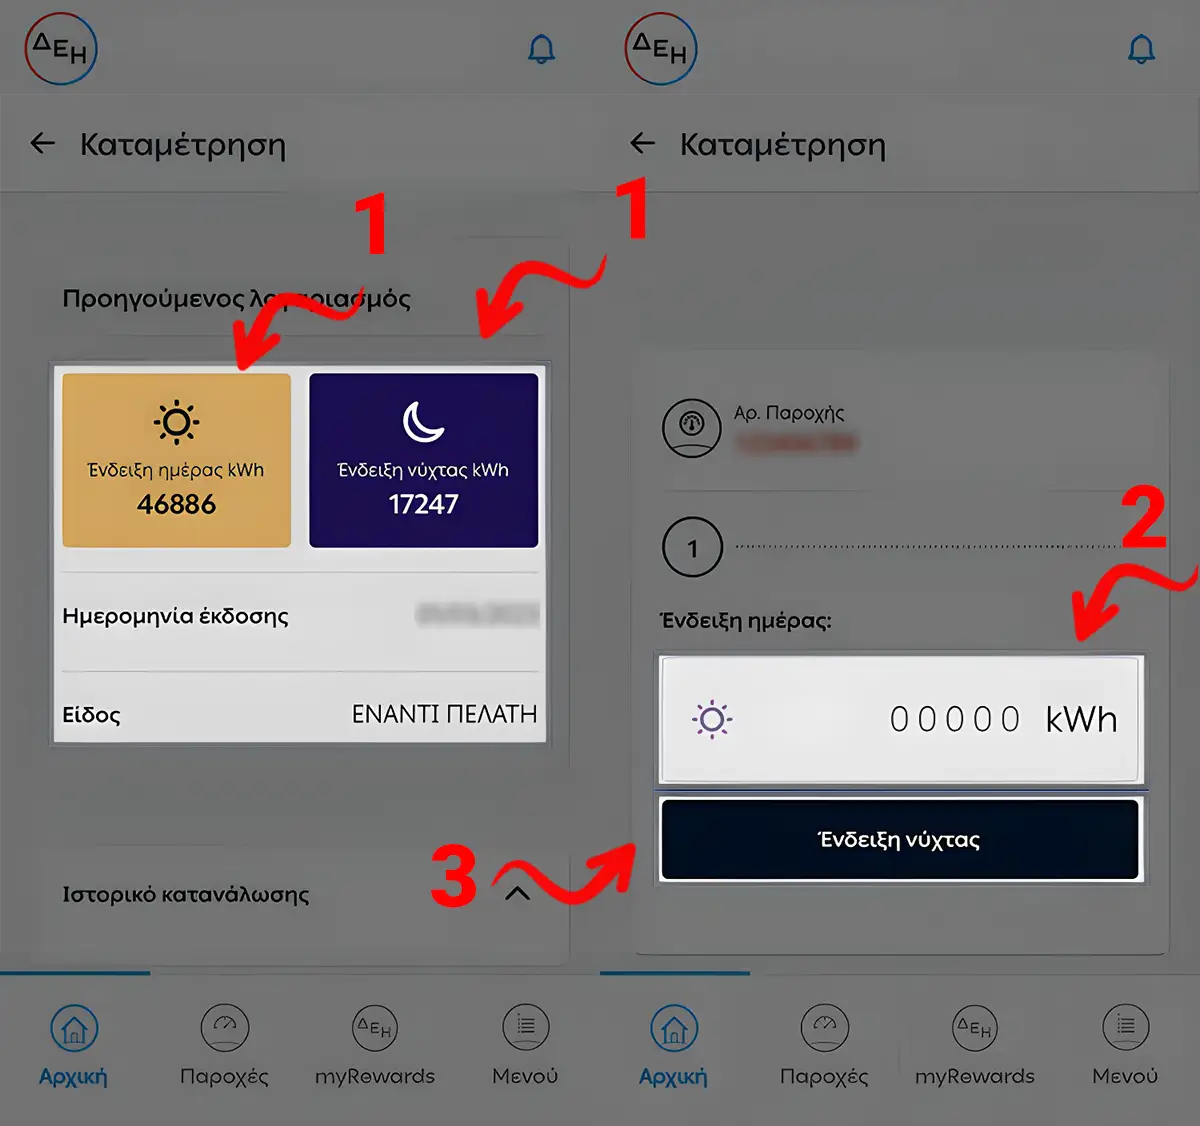
Go further up the screen and find the "Day indicator" option. In the sun field, enter your daily consumption number.
When you're ready, tap the "Night indicator" option to proceed. In some cases, there may be night consumption. In this case, go ahead and enter the corresponding value.
Registration of a licence
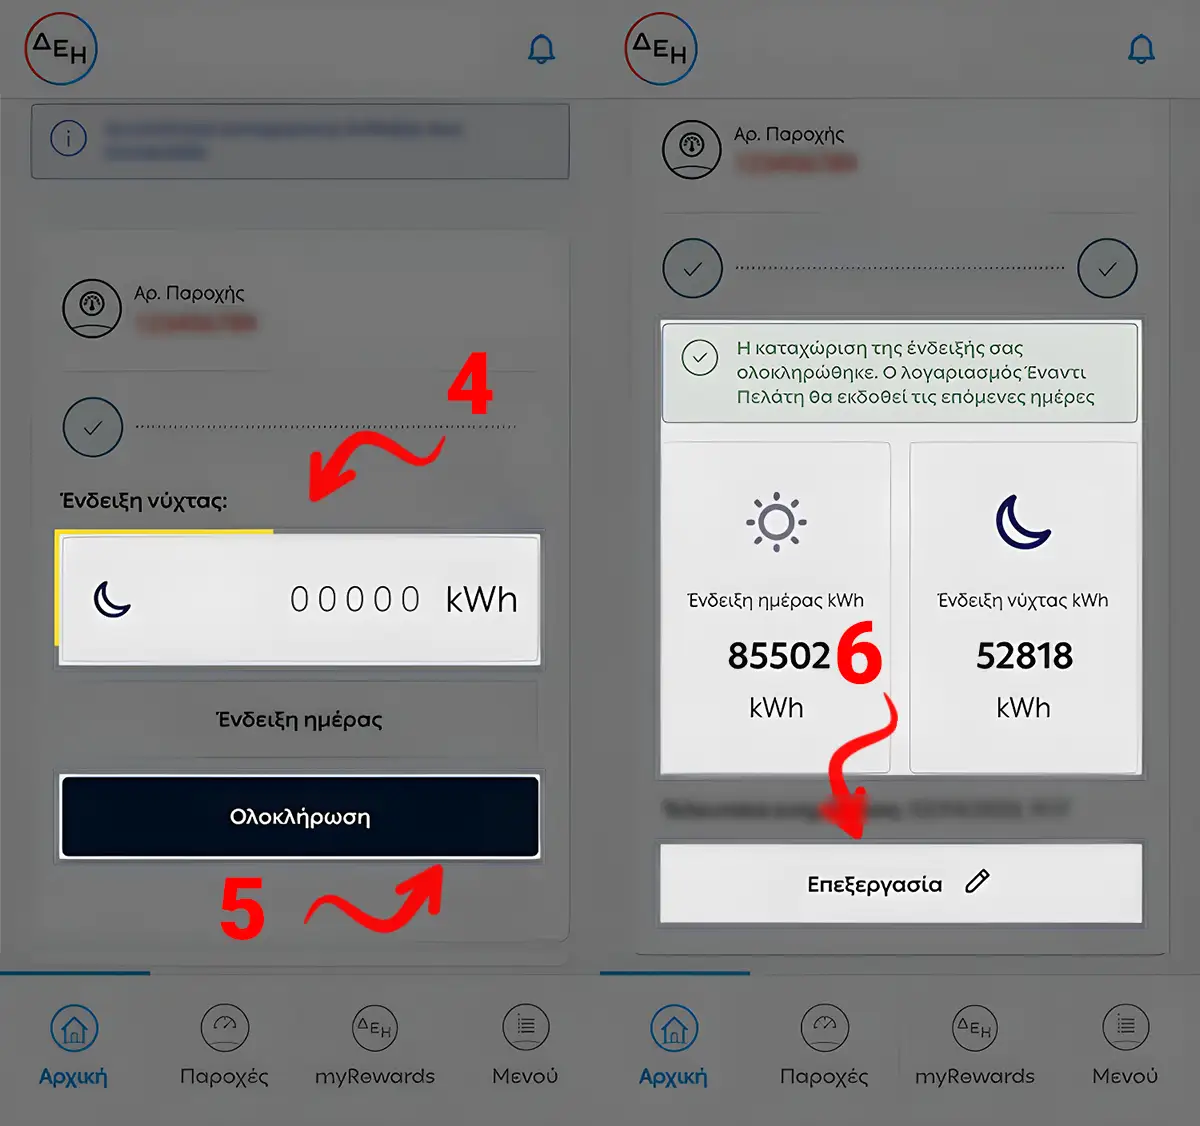
Under "Night reading", enter the night reading of your meter in the field provided by the moon (if there is no night consumption, leave it as zero).
Αφού ολοκληρώσετε αυτό, πατήστε την επιλογή “Ολοκλήρωση”.
If everything goes smoothly, you will see the message "Your registration is complete. The Customer's account will be issued in the next few days" on your screen. Below that, you will find the metrics you just entered.
In addition, if you wish, you can click on the "Edit" option at this point to correct any discrepancies in the measurements, for example, if you detect an error.
In addition, the "Modify" option allows you to correct the measurements even on the myDEH home screen, within the allowed dates.
On the entry page, fill in the necessary details of your measurement, such as the meter values. Make sure all information is correct and up to date.
Step 4: Completion - Submit registration
Complete the registration process by pressing the "Finish" button. Your metering will now be registered in your myDEM account (e-SelfMetering).
e-SelfMetering is the quick and easy solution to manage your measurements with simplicity and convenience.By following these steps, you can save time and effort when entering your measurements.



LATEST NEWS
Νέες Δυνατότητες iOS 18: Τι Να Περιμένετε
MoreiPhone 16: Το μέλλον των smartphones είναι εδώ!
MoreHuawei P70 Pro: Φωτογραφίες και βίντεο επαγγελματικής ποιότητας στα χέρια σας
More